Pages

Friday 8 November 2013

SPRING BREAKERS

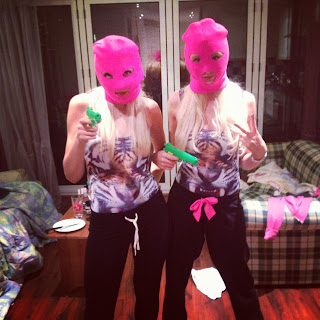
Last week, my friends and I went to a Halloween party. We decided to dress up as the girl gangsters from the film Spring Breakers. We wore bright pink balaclavas, baggy joggers and tiger swimsuits from Missguided. I'll definitely be wearing my swimsuit again - it was extremely comfortable.


I obviously had to paint some nails to match my outfit and to tie in with the theme; this included a dollar sign, palm tree, glitter, gems and water marble art.


Water marble art is the process of dipping nail polish in to water to create a pattern. In order to create this, you will need:

- White polish
- Pink polish
- Yellow polish
- Turquoise polish
- A bowl of water at room temperature
- A cocktail stick


Step 1: Paint the selected nail white and wait for it to dry.

Step 2: Fill a bowl with water at room temperature.

Step 3: Have the 3 coloured nail polishes at the ready - quickly place a drop of each one into the water.

Step 4: Use the cocktail stick to create a pattern in the polish.

Step 5: Place the white nail onto the pattern.

Step 6: Lastly, apply a clear top coat and remove any excess polish with nail polish remover.


This is a quick vine that I made of the process:


Hope you enjoy...


X

Thursday 31 October 2013

HAPPY HALLOWEEN

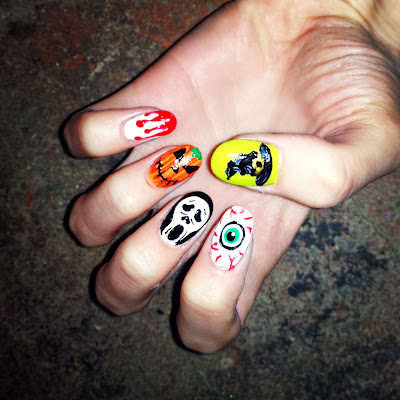
It's Halloween today and I decided to create some spOoOoOoky Halloween themed nails. However, this year I felt as though I had to up my game because last year I won and OPI competition for my Halloween nails...


So, this year I decided to ditch Frankenstein and the scary tree and, instead, replaced them with a witch's hat and Scream. I revamped my pumpkin and eyeball but the blood drips remained the same (not much you can do to spice up blood, unfortunately).


To create my Halloween 2013 nails, I started off by painting the base colours:


Next, I painted on the simple shapes:


And, finally, added in the details!


In terms of costumes, I've had quite a few events to plan for... 

First off was my house-warming in London. We had a red carpet themed party and I decided to dress up as Gwen Stefani from No Doubt. And yesterday, at last minute, I fixed together a ghost costume for a Uni Sport's Social (pretty much just snipped a few holes in a mattress cover and I looked like an absolute idiot). Tomorrow, my friends and I are going to a house party and we're dressing up as Spring Breakers - might have to create some nails for that outfit...


Happy Halloweeeeeen.

X

Friday 23 August 2013

BLURRED LINES

This week, my nails were inspired by the music video for 'Blurred Lines' by Robin Thicke. Specifically, they were inspired by the transparent and white outfits that the models are wearing in the video (the clean version).


So simple to do. All I needed was some white polish, a Wah nail art pen in white and some silver gems.


I love this white and mesh jumpsuit from Missguided, which I think perfectly matches my nails:


The playsuit version:


X

Wednesday 31 July 2013

TO DYE FOR

It's been a couple of months since my last post... decided that I need to start this up again.

I bought a dress from Topshop this week and was inspired to emulate the tie dye pattern on to my nails.


I love the colours on this dress and thought they looked even better together on my nails.
In order to create the blurred tie dye lines, I lightly blended the blue, white and purple polish using a sponge. Next I used an acid yellow colour and a striper to create the little spirals...


Voilà!

X

Tuesday 12 March 2013

ROSE PINK ✿

A couple of weeks ago, I bought this rose coloured pinafore from Topshop:


I thought it would be a nice item to start the Spring in... however, since buying the dress, it's turned really cold outside and it even snowed here the other day. Just my luck. Nonetheless, my dress inspired me to create some pretty rose nails to try and welcome in the Spring:


Here are the steps I took to create these nails...

Step 1: Paint all nails white.


Step 2: Cut off a section of a sponge (can be a make-up sponge or a cleaning sponge) and paint half with a light lilac polish and overlap it with a white polish.


Step 3: Lightly sponge the colours onto the pointer finger and pinkie finger to create a gradient effect. Using another sponge, follow the same process but replace the lilac polish with a light pink polish and sponge onto the thumb and middle finger.

(Sponge the colours on twice to make it bolder & finish using a clear top coat to blend the colours together)


Step 4: Paint the entire ring finger pink and pour on some nail caviar before it dries.


Step 5: Paint an uneven circle, using pink polish, onto the thumb - this creates the rose. Outline it with a black striper or pen and fill the middle of the rose in with details. Finally, paint two green leaves at the side and outline them.


The colours I used:
- Model's Own white polish
- Barry M Nail Paint in Berry Ice Cream (NP308)
- Barry M Nail Paint in Strawberry Ice Cream (NP309)
- OPI in A Rose From the Dead
- Barry M Nail Paint in Spring Green (NP290)

The nail caviar I used was Nail Constellation in Gemini by MUA. I put a clear coat on top of the caviar to make it last longer - unfortunately, after a few days, it started to look a bit tatty so it may have to be updated every couple of days. 


X

Wednesday 6 March 2013

LONDON FASHION WEEKEND

So it has been quite a while since I last posted - I've been very busy, again, and am currently trying to get through a tonne of uni work waah.

It was nearly 2 weeks ago that I received another amazing opportunity... this time it was to work at London Fashion Weekend! I worked on the Thursday, the first day of the event. My job was to work backstage as a dresser for one of the models. There were two types of shows - one was Designer and the other was Trend. The designer for our day was Zoe Jordan who was showing some of her SS13 pieces which were really striking. There were four trends for the Trend show: Graphic, Urban, Eastern and Dolls. 


Backstage


The trends and my lovely model - Vanessa


The best thing about working on the first show was that Labrinth was performing to celebrate the start of the event. We got a glimpse of him backstage and I also had to steam and iron his trousers - such a claim to fame haha. The shows all went very well and even though it was a long and exhausting day, I still had a lot of fun.

I had friends from home visiting me in London and so we went to the last show of London Fashion Week which was on the Sunday. It was interesting to actually see the fashion show from the audience's point of view whereas on Thursday I had been watching from backstage. One of my friends was wearing a hounds tooth dress - I painted her nails to match:


This week, I was set a challenge by my friend (and toppp blogger) Monica to create some nails to match the outfit she was blogging this week. Her dress was made up of a pretty floral pattern:


I decided to draw a gold vine across her nails and then painted flowers, which matched the colour scheme, on top of the vine. My nails were featured on her blog on Monday and you can check the rest of it out HERE!


Photograph taken from www.helloomonica.com

Please follow me on Twitter and Instagram!


X

Wednesday 20 February 2013

SNAKESKIN

This past week and a half has been very busy for me... I went on a trip to Barcelona and I went to London Fashion Week! 

My trip to Barcelona was only for 3 days but it was so much fun and we did a LOT in that time. Before I left for Barcelona, I had several essential tasks I needed to complete: my washing, my packing and (most importantly) my nails. I decided to try out some nail wraps that a friend bought for me, almost a year ago, for my birthday last year.


These snakeskin nail wraps were designed by Myleene Klass and are available here, along with many other designs. They're pretty straightforward to apply; simply match your nail shape to one of the small design sheets, apply it to the nail (it's stick on) and file the excess wrap away. From my previous experience, I've realised that nail wraps do not stay on for as long as promised on the packet. Nor do they look as 'pristine' as they did on the first day. I used a little bit of fake nail glue over the tips of my nails to prevent the wraps from peeling back.

Snakeskin is definitely a trend to watch this year - currently loving it in the 'Just Cavalli' advert featuring Georgia May Jagger:


Here are a couple of 'snake inspired' items that have also caught my eye...


Snake ring: Wildfox
Snake ring bandeau bikini top: Playful Promises (ASOS)
Snakeskin dress: Religion (ASOS)
Snakeskin iPhone 5 cover: Topshop


My snakeskin nails inspired me to bring out a pair of snakeskin wedges that I own from ASOS and there was no better place to wear them than to London Fashion Week! 


The photograph of myself (top left) was taken by Louisa Rogers.
To accompany my wedges, I wore a plain black dress with a black studded bag - both from Urban Outfitters.

At this start of this week, at very short notice, I got the opportunity to actually work at one of the shows at London Fashion Week. So on Monday I was an intern for a day at the Pringle of Scotland show. I wasn't doing anything terribly important, but it was an exciting experience to see the show and to observe the many different types of people who came to view it. And of course I had to freshen up my nails for the event (my nail wraps were starting to look a bit scruffy) so I created an acid yellow and blue design - inspired by WAH nails:


Acid Yellow Polish: Barry M - np300
Cobalt Blue Polish: Barry M - np291

Please follow me on Twitter on @McKinzzz :).


X